How It All Ends …
Howdy! I sure hope you saw Part One Of This Journey
And no, this is not the end of my laptop. “How it Continued” didn’t have that swig of dramatic punch.
Where I Left Off
In Part One, I jumped through some hoops to get my HP ProBook 4530s from Amazon backed up, installed Snow Leopard on it in a VirtualBox (just so I could get to the App Store to Buy Mountain Lion), made a bootable USB key, and got a perfectly working Mac for < $500 that I never have any problems with…
No, I didn’t change my name to Pinocchio. Stop looking at me that way.
The important bit about the first part was to follow the Guide to Installing Mountain Lion on HP Probook. Another good bit is that I deliberately cloned the internal drive, knowing that I was going to need to come back and get some Windows 7 drivers from it that are specific to HP.
I actually do have a very stable Mac install on my HP. It’s a great exercise, and quite the everyday usable laptop. I think I could take on a Mac Pro class desktop machine build from scratch that dual boots Mountain Lion and Windows 7.
How Do We Make This Even Better?
I flow from Mac to Linux to Windows. I suppose I could Dual Boot to Linux, but in this case, I am going to pick Windows 7. It’s easy to run Linux in a VirtualBox (my fave distro is Linux Mint) if I need to. Besides, Linux tends to be a server side thing for me …
So! Today’s Project is to add Windows 7 back to the Laptop without getting all Fubar’ed.
What we have been using to boot into Mac from the first part (where I referred to the Guide to Installing Mountain Lion on HP Probook) prepares us well for dual booting. That booting agent is called “Chimera”.
Get Your Things Together
Here are the things I had on hand for doing my install, and updating the boot process to see both Mac and Windows 7:
- There is an assumption that you have a working Mac install on the HP, and that the drive has two partitions (one for Mac, and one for Windows that is free to be used).
- The external USB drive, where I had cloned the original setup that came on the laptop (leave it unplugged for now).
- The USB key with the Mac installer on it. Leave that off to the side for now.
- Another USB key. We’re going to put a Windows 7 installer on it. We will call this the Win7 key. It should be at least 4gb, and you will be reformatting it.
- The Windows 7 ISO file. More on this in a moment.
- A program for burning the ISO to the Win7 key. More on this in a moment.
- The Activation Key for Windows 7. This code is inside the battery compartment of the HP laptop. You already own a legal copy of Windows 7 Home Premium! Go write it down, or whip out your phone and grab some Clear Shots of it. Got it? Brill!
The Windows 7 ISO (Image for DVD or USB)
Since you have an Activation Key for the Home Premium edition, it is easiest to go find the matching image – you want the 64 bit version:
I grabbed this one from My Digital Life: Windows 7 Home Premium x64 (64-bit)
I also noticed (after the fact) that there ISO’s available which already have Service Pack 1. I’ll be conservative (chicken out, that is) and say “I did not try that, but it should work fine”. You can certainly search on “windows 7 download iso”. Make sure you get the ISO from a legit site, such as “Digital River”.
As you would expect, downloading an entire OS makes for a large file. Depending on your connection, it could take about 2-5 days to complete. You should hover over your keyboard at all times to make sure that your computer doesn’t do something silly, such as “go into sleep mode”.
I’m pulling your leg. It wont be that bad at all. No, really. (snickers)
Burn Baby, Burn
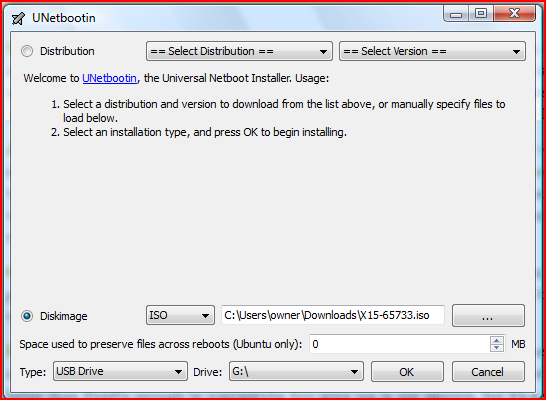
Now that you have a behemoth ISO file to burn to your USB key, you will need an app to do just that. In my case, I’m working from an old Windows desktop machine, and I recommend using UNetbootin. Note that this is Free, and that there are also versions for Mac and Linux.
Use Unetbootin to burn your empty Win7 key (not the Mac install one!). You want to select the diskimage (ISO) that you downloaded. It will look like this:
Once the key is burned, you are set to plug it into the HP, and boot it off of the key…
The Actual Windows Install Process
Since you have a working Mac install, you are familiar with how to tell the HP to boot off a key, instead of an internal drive (hit escape when the machine starts up, then F9 to get to the menu where you select the USB key device).
The installer will start up, and here are the basic steps:
- At the first dialog, there is an “Install now” button. Click that.
- Setup is now starting… and leads to a licensing dialog.. go on…
- Which type of installation do you want? You want “Custom (advanced)”
- Where do you want to install Windows? Well – pay attention here! This part is serious! For me, I used Disk 0, Partition 3 (in other words, the unused big one). Format for that, and continue with the install.
At some point during the Windows 7 install, you will be prompted for your Activation Key for Windows 7 Home Premium. Being the awesome person that you are, you have it handy.
Note that during the Windows install process, the machine will reboot, and act as if the Mac partition does not exist. Don’t panic. It’s still there!
Follow the Windows install through, until you are logged in and at the usual Windows Desktop. Note that the screen resolution is terrible, since you have not installed the HP-supplied drivers yet. We’re going to deal with that, but first, let’s get the dual boot functionality going.
Back To Mac
Remember that lovely USB key with the Mac OS X Mountain Lion installer and the oh so handsome HP Probook Installer? You still have that, right? It’s showtime!
Ok! So we have an HP laptop with Mac and Win 7 installed, but Windows overwrote the boot code on the disk… it only thinks about itself. Yeah, I know…. we’re going to deal with that right now.
Boot off the USB key with the Mac installer. You will see a menu that lets you boot off the Mac install on the internal laptop disk. Do so.
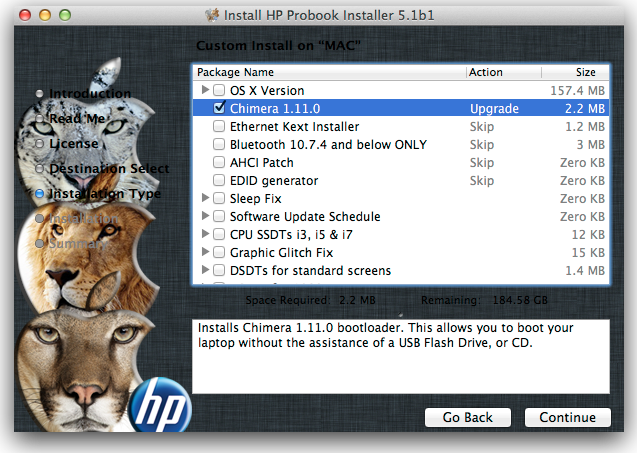
Remember using the HP Probook installer to get the Mac going in the first place? We’re going to use that again. We only need one thing, and that is to reinstall Chimera. That will fix our boot process so that we have a choice of Mac or Windows. It looks like this:
Run that, and unmount the USB key from the finder. Now reboot.
When the laptop reboots, interrupt the countdown for booting to Mac. I use the arrow keys. Notice that you now have the choice of Mac or Windows. Hooray! Go ahead and boot into each one, to assure yourself that it worked.
One Last Task
Now that we can boot however we wish, let’s fix up Windows. Remember how we backed up the original install to an external USB drive? Now we need some things off of that.
Do this in Windows:
- Attach the external drive
- Use the main partition (the one with Program Files on it)
- Open the “swsetup” folder
- Open the “AppInstl” folder
- Run “HPSoftwareSetup.exe”
- This launches the HP Software Setup utility…
- Pick “Hardware Enabling Drivers”
- From there, you will see a list of all the HP-provided hardware drivers. I use “Select all” at the top of the dialog
- Hit “Install”, let it do its thing, and reboot
Congrats, you should now have a very functional Windows 7 install! The first thing you should notice is that you now have the full screen resolution. Enjoy!


