Why I Am Adding Social Login For Comments

Some Social Login History

As you may know, I just posted “Social Syncing Sucks Away Your Privacy“. I zeroed in on two aspects:

When I put those together, it gives me a moment of pause, and makes me think “I always want the option to use an email or username signup”. I want that option to “try before they pry”.

And I stand by that … yeah, I do. Really … but read on …

Adding Social Login For Comments

I am adding Social Signon for comments on this blog.  Blasphemy! Harumph! Objection!

See, the keyword there is “adding”. I have very good reasons for doing so:

  • I want to encourage comments on this blog
  • Someone may not want to give an email address for the 123rd time today, just so they can comment. They just want to use their Facebook, Twitter, WordPress, Google+, or some other id, and get on with it
  • I get an idea of which services are most used by my commenters, and that gives me a warm fuzzy feeling of being that much more in touch with them

I would like to be using the “LoginRadius plugin for Social Login and Social Sharing“. They appear to be pretty well thought of.  It’s not working yet, though, so I am going to punt for the moment and use the JetPack Comments Module (I don’t like this as much.  Would be better to have CommentLuv + More Social Signon options).

You can always do the comment thing with an email address. That’s not going away.

Social Login: Give Your Data To Me!

“But Wait!”, you say! Didn’t I just do this whole spiel about being mindful of privacy?

Oh, totally, dude… Fer sure I did. And I still mean it. You should pay attention to this stuff. The key thing to bear in mind for any service is “which data are they asking for?” Mere commenting does not need much data (we’re not trying to do a photo album service that blends the timelines for you and your friends, along with birthdays, GPS coordinates, and relationship status and hourly mood). I just want to know you are actually logged in somewhere.

Changing This Soon

As mentioned above, the LoginRadius option isn’t working yet.  It’s better to get this post out there, and have 70% of what I want, and the circle back and figure out how to get a more well featured option going.  I did post a question about this at wordpress.org.  Let’s hope it’s something cinchy!

Posted in blog, Privacy, Social, Technical | Tagged , , , , | Comments Off on Why I Am Adding Social Login For Comments

Social Syncing Sucks Away Your Privacy

What’s Up With Social Signup and Photo Syncing?

Two articles in the TechCrunch this week illustrate a need for vigilance with your own privacy.  Check It:

Do I care about my Privacy?

If you are into sharing everything, you may not care much about privacy.  You may not care about handing over large chunks of your real and online life details over to Facebook.  It may not bother you that you Can Never Go Back and Completely Erase Your Online Past.  You may be under some illusion that somehow you will “get lost in the noise”.

Think of everything that you do online via a Facebook or Twitter login as a form of digital tattoo.  Social Signup simply means that you are using those logins on other services, so that they know who you are.

It’s a balance. Using Social Signup makes things more convenient and interconnected, but it also means you give up some control. You allow Facebook and Third Parties to have quite a glimpse into your life. Where’s your comfort zone today? Ok, now forget that… where is your comfort zone going to be in a year from now, or 10 years? That’s the choice that should guide you!

Social Signup: Who am I giving my data to?

The thing about social-only signup is that it is easy for a developer to log you in to their service, once you are authenticated via your Facebook or Twitter account.  They dont have to write their own login mechanism.  How do I know this?  I’m a web developer!

In other words, once upon a time, your Facebook data was known only to Facebook, and the same went for Twitter.  Every time you sign up for some new service (example: Spotify) via Facebook or Twitter, they have access to a fair bit of your data, such as your friendslist, or your history of tweets.  How many services are you signed up for? 10? 20? 50? 50, Really!? Gawd, you’ll join anything, huh!? You web service-sl*t, you!  Ay yi yi 😉

The way to maintain more control is to sign up by using your email address. If you use gmail, you might even customize your address (via “+”) for some services, such as “me+SomeService@gmail.com” and “me+SomeOtherService@gmail.com”. That gives an easy way to filter (or eventually snip) everything to do with that service. A quote from the Techcrunch article on Social Signup likens it to dating:

Rockmelt co-founder and CEO Vishria tells me his company learned a big lesson from a big hire — Draw Something’s head of product. She told Vishria that “because of privacy implications, people want to try an app with email and then add social later if they like it.” I call this “try before you pry,” and Vishria explains “there’s a certain level of trust that builds over time”

Auto Photo Sync: Shutter Trepidation!

Photo Sync is simple: every photo you take gets uploaded to Facebook in the background.

“ohhhh how convenient!” You squeal with glee! “my photos are boring, so who cares!?”.

Oh yeah? Two words: Time and Location. From an original photo uploaded to Facebook, the time and absolute location are easily available. This form of tracking history can be used for something as harmless as highly targeted ads, or it could get deeper and more annoying. Think 🙂

If I am not mistaken, one of the key things that should make people think twice would be: Third Party Apps that can access your photo albums. Even if the photos are truly Facebook-only for now, do you trust that Facebook will always keep things that way?

Social Signon Is Your Digital Tattoo

Every day on the net is a layer of your Digital Tattoo. Don’t start assuming that Facebook is the only Silo that can see it all. It’s leaky, and every time you use a form of Social Signup, you punch another hole in that Silo. Always ponder which keys you are giving out to your digital kingdom.

Posted in blog, Privacy, Social, Technical | Tagged , , , , | Comments Off on Social Syncing Sucks Away Your Privacy

The Story of My Hackintosh Laptop – Part 2

How It All Ends …

Howdy!  I sure hope you saw Part One Of This Journey

And no, this is not the end of my laptop.  “How it Continued” didn’t have that swig of dramatic punch.

Where I Left Off

In Part One, I jumped through some hoops to get my HP ProBook 4530s from Amazon backed up, installed Snow Leopard on it in a VirtualBox (just so I could get to the App Store to Buy Mountain Lion), made a bootable USB key, and got a perfectly working Mac for < $500 that I never have any problems with…

No, I didn’t change my name to Pinocchio.  Stop looking at me that way.

The important bit about the first part was to follow the Guide to Installing Mountain Lion on HP Probook.  Another good bit is that I deliberately cloned the internal drive, knowing that I was going to need to come back and get some Windows 7 drivers from it that are specific to HP.

I actually do have a very stable Mac install on my HP.  It’s a great exercise, and quite the everyday usable laptop.  I think I could take on a Mac Pro class desktop machine build from scratch that dual boots Mountain Lion and Windows 7.

How Do We Make This Even Better?

I flow from Mac to Linux to Windows.  I suppose I could Dual Boot to Linux, but in this case, I am going to pick Windows 7.  It’s easy to run Linux in a VirtualBox (my fave distro is Linux Mint) if I need to.  Besides, Linux tends to be a server side thing for me …

So!  Today’s Project is to add Windows 7 back to the Laptop without getting all Fubar’ed.

What we have been using to boot into Mac from the first part (where I referred to the Guide to Installing Mountain Lion on HP Probook) prepares us well for dual booting.  That booting agent is called “Chimera”.

Get Your Things Together

Here are the things I had on hand for doing my install, and updating the boot process to see both Mac and Windows 7:

  • There is an assumption that you have a working Mac install on the HP, and that the drive has two partitions (one for Mac, and one for Windows that is free to be used).
  • The external USB drive, where I had cloned the original setup that came on the laptop (leave it unplugged for now).
  • The USB key with the Mac installer on it.  Leave that off to the side for now.
  • Another USB key.  We’re going to put a Windows 7 installer on it.  We will call this the Win7 key.  It should be at least 4gb, and you will be reformatting it.
  • The Windows 7 ISO file.  More on this in a moment.
  • A program for burning the ISO to the Win7 key.  More on this in a moment.
  • The Activation Key for Windows 7.  This code is inside the battery compartment of the HP laptop.  You already own a legal copy of Windows 7 Home Premium!  Go write it down, or whip out your phone and grab some Clear Shots of it.  Got it?  Brill!

The Windows 7 ISO (Image for DVD or USB)

Since you have an Activation Key for the Home Premium edition, it is easiest to go find the matching image – you want the 64 bit version:

I grabbed this one from My Digital LifeWindows 7 Home Premium x64 (64-bit)

I also noticed (after the fact) that there ISO’s available which already have Service Pack 1.  I’ll be conservative (chicken out, that is) and say “I did not try that, but it should work fine”.  You can certainly search on “windows 7 download iso”.  Make sure you get the ISO from a legit site, such as “Digital River”.

As you would expect, downloading an entire OS makes for a large file.  Depending on your connection, it could take about 2-5 days to complete.  You should hover over your keyboard at all times to make sure that your computer doesn’t do something silly, such as “go into sleep mode”.

I’m pulling your leg.  It wont be that bad at all.  No, really. (snickers)

Burn Baby, Burn

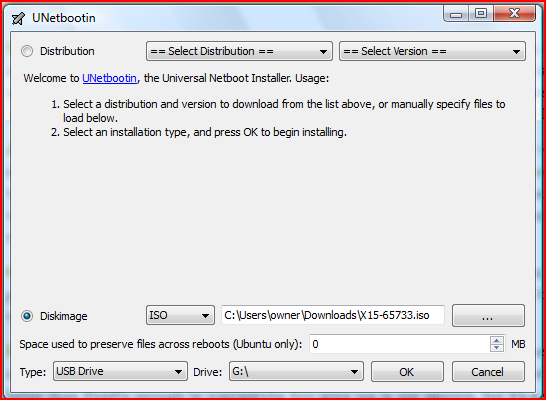
Now that you have a behemoth ISO file to burn to your USB key, you will need an app to do just that.  In my case, I’m working from an old Windows desktop machine, and I recommend using UNetbootin.  Note that this is Free, and that there are also versions for Mac and Linux.

Use Unetbootin to burn your empty Win7 key (not the Mac install one!).  You want to select the diskimage (ISO) that you downloaded.  It will look like this:

UNetbootlin Screen

Once the key is burned, you are set to plug it into the HP, and boot it off of the key…

The Actual Windows Install Process

Since you have a working Mac install, you are familiar with how to tell the HP to boot off a key, instead of an internal drive (hit escape when the machine starts up, then F9 to get to the menu where you select the USB key device).

The installer will start up, and here are the basic steps:

  • At the first dialog, there is an “Install now” button.  Click that.
  • Setup is now starting… and leads to a licensing dialog.. go on…
  • Which type of installation do you want?  You want “Custom (advanced)”
  • Where do you want to install Windows?  Well – pay attention here!  This part is serious!  For me, I used Disk 0, Partition 3 (in other words, the unused big one).   Format for that, and continue with the install.

At some point during the Windows 7 install, you will be prompted for your Activation Key for Windows 7 Home Premium.  Being the awesome person that you are, you have it handy.

Note that during the Windows install process, the machine will reboot, and act as if the Mac partition does not exist.  Don’t panic.  It’s still there!

Follow the Windows install through, until you are logged in and at the usual Windows Desktop.  Note that the screen resolution is terrible, since you have not installed the HP-supplied drivers yet.  We’re going to deal with that, but first, let’s get the dual boot functionality going.

Back To Mac

Remember that lovely USB key with the Mac OS X Mountain Lion installer and the oh so handsome HP Probook Installer?  You still have that, right?  It’s showtime!

Ok!  So we have an HP laptop with Mac and Win 7 installed, but Windows overwrote the boot code on the disk… it only thinks about itself.  Yeah, I know…. we’re going to deal with that right now.

Boot off the USB key with the Mac installer.  You will see a menu that lets you boot off the Mac install on the internal laptop disk.  Do so.

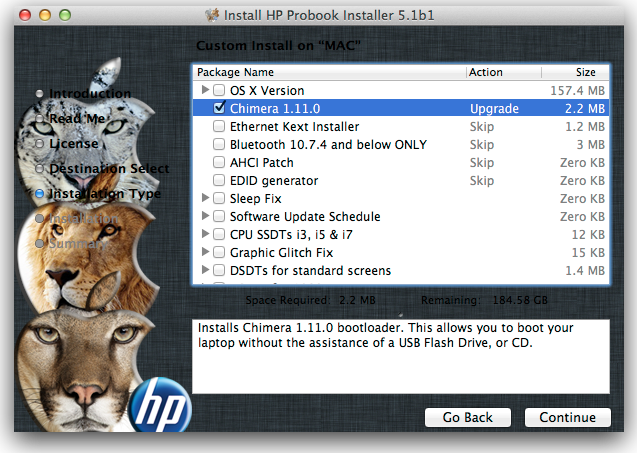
Remember using the HP Probook installer to get the Mac going in the first place?  We’re going to use that again.  We only need one thing, and that is to reinstall Chimera.  That will fix our boot process so that we have a choice of Mac or Windows.  It looks like this:

Run that, and unmount the USB key from the finder.  Now reboot.

When the laptop reboots, interrupt the countdown for booting to Mac.  I use the arrow keys.  Notice that you now have the choice of Mac or Windows.  Hooray!  Go ahead and boot into each one, to assure yourself that it worked.

One Last Task

Now that we can boot however we wish, let’s fix up Windows.  Remember how we backed up the original install to an external USB drive?  Now we need some things off of that.

Do this in Windows:

  • Attach the external drive
  • Use the main partition (the one with Program Files on it)
  • Open the “swsetup” folder
  • Open the “AppInstl” folder
  • Run “HPSoftwareSetup.exe”
  • This launches the HP Software Setup utility…
  • Pick “Hardware Enabling Drivers”
  • From there, you will see a list of all the HP-provided hardware drivers.  I use “Select all” at the top of the dialog
  • Hit “Install”, let it do its thing, and reboot

Congrats, you should now have a very functional Windows 7 install!  The first thing you should notice is that you now have the full screen resolution.  Enjoy!

Posted in blog, Hackintosh, Mac, tech, Technical, Windows | Tagged , , , , | Comments Off on The Story of My Hackintosh Laptop – Part 2

The Story of My Hackintosh Laptop – Part 1

How It All Started …

A few months back, I had a work-provided, shiny 15″ Macbook Pro. We went everywhere together… long moonlit walks.. surfing the web in a dark cafe, with a cliche candle dripping scented wax all over an old Chianti bottle… bike rides in the country with baguettes and brie … the sound of its fan so soothing …

And then that job ended, they laid off everyone in sight, and snatched back our Macbooks with cold corporate fingers. Bastards.

It sucked, and there was much wailing and gnashing of teeth. We all loved our MacBooks.  Even Mr P, a diehard Windows fan, broke down and cried like a little girl.  There are fingernail scratch marks on what was “His” Macbook Air from the effects of all the prying.

Now, as it happens, I love diving into little tech projects. So while I could not dash out and buy my own MacBook, I was able to research cheap less expensive alternatives to getting the Mac laptop fix I crave.  I did just that, and perhaps my newfound joy of putting together a dual booting (Mountain Lion and Windows 7) machine for ~$500 will inspire you. It could also make you toss your hands up in the air, head to the nearest Apple Store, and do it the easy way. I wont pout.

To keep this post from getting insanely long, I’m going to point at some sources of information that really helped me get through the process. I didn’t write down every single step.

The Hardware

I bought an HP ProBook 4530s from Amazon. When I purchased it in mid-September 2012, it was $488.95.  I saw the price drop to $450ish. Now I see it for $518! It could be that the supply is drying up, as it’s been discontinued. Mine was this one: 2.30 GHz Intel Core i3-2350M, 4 GB RAM, 500 GB Hard Drive, DVD+/-RW SuperMulti Drive, Windows 7 Home Premium 64-bit.

Some of my thinking about getting this specific model came from:

Even though the 4530s is pretty well suited to running Mac OS, there are some hoops to jump through, and I ended up getting USB Dongles for Bluetooth and Wifi (as opposed to ordering a card and opening it up).

This is not a One Beer Project.  You may even be tempted to switch to something stronger in mid-stream.  I don’t recommend that.  Save that for the end 🙂

Here’s list of some hardware bits that were helpful for my project. You don’t need everything here!  I basically wanted to clone the laptop disk, add more memory, and go the route of having reusable usb dongles for bluetooth and wifi.

Backup Your Laptop First

Stop! Don’t Go Into Cowboy Mode!  Don’t get all Cavalier on this!

You recall that I had an external USB drive in my list earlier on? Go grab EaseUS Disk Copy Home Edition 2.3.1 – it’s free. You will want to create a bootable CD or USB key to run it.  It can completely clone drives (partitions and all).

So, yes, if you are following along, make a backup of the HP. Don’t make me come over there! (looks over top of glasses with raised eyebrow).

I’ll give you another reason to back up your machine: we’re going to clobber the internal disk, and in the case of the HP laptop, I needed to get to some of their driver software later on (and they dont provide a DVD of Windows 7 with their laptops.. it’s all on the internal disk)

Backed up? Ok then, yeeehaw, Buckaroo! Let’s fling some bits around…

The Mountain Lion Acquisition Problem

So here is a little detour which may make you smirk at my ancient Mac hardware, or break out in a case of the “wows”. I think it’s going to be more of a smirkfest.

I have an old Intel iMac from 2006. It is a 32 bit machine, and Mountain Lion (Mac OS 10.8) wont run on it. To rub salt into the wound, the App Store wouldn’t even let me purchase it from that machine. All I needed was the downloaded installer for Mountain Lion to use elsewhere. You cant buy ML from Apple on a DVD or USB key.

So, what I needed was a Mac running a 64 bit OS, so that I could run App Store, in order to buy and download the Mountain Lion installer …

… simple, huh?

Just to be clear, if you have access to a recent 64 bit Mac that can download Mountain Lion, you will not have to jump through the silly hoop I am about to mention.

As it turns out, my HP came with Windows 7 in 64 bit mode, and I do know how to install VirtualBox. I own the Snow Leopard (Mac OS 10.6) install DVD, so I was able to create a virtual machine running Mac, under Windows.  Here are some tips on how to do that:  How to install a Snow Leopard Hackintosh in Virtualbox [Windows]

There are other articles out there that mention downloading pre-hacked versions of Mac OSX.  Stay Far Away!  Get your own legal copy and follow the steps.  Mountain Lion is only $19.99.  Cough it up!

Once I had Snow Leopard running as a virtual machine (under Windows 7, on the HP), there was only one thing I wanted to do with it … get the install image of Mountain Lion and get on with it.  You basically want to copy the Installer that is put in /Applications/Install Mac OS X Mountain Lion.app

Installing Mountain Lion On An HP 4530s

Ok, here we go… the big show! And what am I going to do? I’m going to punt and point to Guides! Much Braver People than I have thoroughly explored and documented the process. I am merely your Tour Guide.

The basic steps are going to be:

  • creating a bootable USB key with the Mountain Lion Installer and other utilities on it (I was able to use my old iMac to go through that process)
  • booting the HP from the key, and formatting the disk with the Disk Utility (from the Installer)
  • doing the actual OS install
  • running the HP Probook Installer to enable various hardware components

There is one main link I have for guiding you:  Guide to Installing Mountain Lion on HP Probook

I think that one is pretty thorough for walking one through the process.  In my case, I used Disk Utility (off the bootable USB key) to change the internal HP disk to GUID format, with two evenly split partitions.  The second partition is for my Windows 7 install (which I will cover in the second part of this writeup).   I made the second partition FAT format, just for reference.  A later Windows 7 install will overwrite that as NTFS.

In the process, you will want to have some things on hand.  You will need to register with tonymacx86.com to download them:

The guide is also good at calling out some specific issues that you may run into.  I know that the App Store gave me 10.8.2, which had a booting error.  You may need to refer to this:

How to fix the boot0 error for your Hackintosh

Gee, Is That All?  (Summary for now)

Heh, looking back over this, it would seem like a minefield of obstacles to get Mountain Lion going on a Laptop.  In some ways, sure, it can be.  It is worth it for me!  For about 1/3rd the cost of a decent Macbook Pro, I have a very functional Mac (and Windows 7) Laptop.  It is one those projects where, if you’ve done some software or hardware mods in the past, then It Is All Possible. And Worth Doing.

Legal Stuff

Someone is bound to ask.. wait, is this Legal?  Hey, I proudly bought all of my Apple Software, and will purchase more via App Store while running Mountain Lion.  I can also point to some additional opinion:

My sense is that Apple has a lot of sense about this.  The more they get Mac OS out there, the more software they will sell.  I cant afford a shiny Macbook Pro from them at the moment, but I can sure afford some of their apps.  I see it as a win-win!  Their software license also specifically covers running the OS as a virtual machine, which is great.

Finally, I’ve been buying Apple Hardware since 1997 (not only for myself, but for extended family when I was able to, way back when… )  I think they know I’m a pretty good customer 😉

Part 2 coming soon!

Posted in Hackintosh, Mac, tech, Technical | Tagged , , | Comments Off on The Story of My Hackintosh Laptop – Part 1

My Social Media Enchilada

temporary: just 1 line to claim my own blog on Technorati: WS5HV6J75V3D

Hello! It’s Me!

So hey, I have not paid attention to my blog, or twitter, or much of Facebook for pretty much “forever” in Internet Time.  I gots to monetize and brand and be coherent!

Motivation

I’d recently been asked to look into how blogs are monetized.  It’s always been something I’d wanted to do, but then I would think “oh no, I’d be selling out.. it’s not pure writing for the joy of it, etc”.   Well, to use the technical term: pfft!  I think I can write on the tech and creative sides without selling out (you know, Campbells Soup really is “mmm mmm good”  — see how I slipped that one in there?)

So anyway, I’d like to tie together my social media presence (presences?  presenceii?), have them funnel into my blog, sell a bunch of ads, and make scads of moolah.

The other big motivation is to be skilled at it, technically and creatively.  I’ve ignored the whole blogging aspect for way too long.  I really think it should be the long-form “hub” of what I do online.

Implementing Online Coherence

Ok, that is a deliberate heading there… kinda meant to be indexed to send some SEO tool into some fit of joy …

I’m basically using some WordPress plugins to make is easier to:

Sharing Blog Posts

The sharing aspect was relatively easy to implement.  I recommend using the Sharing module of Jetpack.  It lets you drag and drop the services you want.  I enabled Email, Facebook, Twitter, and Google+.  I’m sure I will enable more as I get all brave and bold and so on.

Google AdSense & Amazon Associates

Getting these two set up was a headache joyous experience that I recommend wholeheartedly.  I’m still waiting for final approval from Adsense.  They are wonderful people over there.  I dont usually fall in love with strangers, but, that bunch, yeah… they’ve got it going on!  So anway, am sure you are just dying to know the entry points:

  •  Amazon Associates – chances are you have an Amazon Account.  With that, you can add on an Amazon Associates ID.  Once you are set up, you can point to your favorite products from anywhere in your blog.  If people buy them, you get a referral fee.
  • Google Adsense – Go to the Google AdSense Entry Point and sign up.  The basic idea is to have ads that appear in your blog that are related to the keywords / phrases you are using.  You get paid when they are clicked on.

SEO (Search Engine Optimization)

This is a huge topic, and I am very new to it.  Two ways I can tackle it are to be more aware of how I write (without breaking my style, selling out, or being a dork), and to use good tools to see how things measure up as I am writing.  I am just getting going with the plugin: WordPress SEO by Yoast.  A two part series that I enjoyed on SEO, which helped me wake up to the importance of little tweaks that can help boost readership:

The Enchilada

So, my personal enchilada goes something like:

  • have my facebook and twitter posts show up here
  • when I post here, broadcast to FB and twitter (and elsewhere) to encourage readership
  • make it easy to share posts
  • do well in search rankings
  • have relevant ads, but dont have them distract from the site.
  • be incredibly nice to the wonderful people at Google AdSense, now and *after* they approve of my account.  Hey! Google Person!  That looks heavy – may I carry that for you?  Oh, it’s no problem – I drive 90 miles down here every day just to help you folks out.  Doesn’t everyone!?
Posted in blog, Social, tech, Technical | Tagged , , | 3 Comments

One Link, Many Paths, Clicking Choice! (MultiLink, Part 3)

MultiLink, The 3rd Demo

The 3rd Demo is up!

This is Part 3 post about MultiLink.  I laid a lot of groundwork about the idea of one click: many targets, in Part 1 and Part 2.

As I’ve written, MultiLink uses an HTML5 data attribute to get the names or tags of items to put into a list.  You could think of it as spreading some placeholders around a web page.  They are given meaning once those names are paired with some data that specifies a web address and a label 1

What’s New?

To very quickly summarize the new parts of this demo, I can show two snapshots:

Include the contents of a data attribute from elsewhere …

Which uses:

<!-- we have #cars1 and #cities1
     defined elsewhere on the page -->
<a id="carcity1" class="multilink"
data-dls-links="#cars1, #cities1">#cars1, #cities1</a>

… and, do interesting operations with tags:

Which uses:

<!-- we step through tags from left
     to right -->
<a id="nycorbridgenolon" class="multilink"
data-dls-links=".nyc | .bridge - .london"
>"nyc OR bridge, without London (| and -)"</a>

What that means is …

  • We can include entire data attributes from elsewhere, recursively
  • We can expand tags to a set of matching items, and combine those sets with basic “AND”, “OR”, and “WITHOUT” operations

Break It Down, Bucky!

So like I said: The 3rd Demo is up!  — that explains a lot that I cant (yet) show in a blog post.

… However …  I can lay out a couple of examples as to when/why someone would use the new functionality.  I think I need a couple of names to refer it…

  • ID Includes – grab the contents of a data attribute from elsewhere, to make it a part of the current thing we’re looking at
  • Tag Expressions – combine sets of tag results in different ways

Cool, so I now I can move on and explain the examples.

ID Includes

If I wind back to the basic functionality of MultiLink, it’s looking at a list of “Link IDs” that match some block of data. So, when we have this on a web page:

<a id="beer1" class="multilink"
data-dls-links="sierranevada, fosters, pilsnerurquell"
>beer</a>

We match these items in a block of data:

"sierranevada": {
	"label"	: "Sierra Nevada",
	"url"	: "http://www.sierranevada.com/",
	"tags"	: ["beer", "ale"]
},

"fosters": {
	"label"	: "Fosters Beer",
	"url"	: "http://www.fostersbeer.com/",
	"tags"	: ["australia", "beer", "lager"]
},

"pilsnerurquell": {
	"label"	: "Pilsner Urquell",
	"url"	: "http://www.pilsnerurquell.com/us-home",
	"tags"	: ["beer", "pilsner"]
}

The HTML element with the ID of “beer1” contains a data atribute. That data attribute refers to a list of items we hope to match in our block of JSON data.

I dont want to keep typing “sierranevada, fosters, pilsnerurquell” all over a web page in a data attribute. Besides, that list might change. I can have data atributes elsewhere on the page simply refer to “#beer1” (the HTML id), and pick up whatever I find in that list.

So, a leading ‘#’ is used to specify a reference to some HTML id.

And… this gets recursive…


<a id="sportscars" class="multilink" data-dls-links="bmwe36, ferrari360">
sports cars</a>

<a id="suv" class="multilink" data-dls-links="toyotalandcruiser, fordexplorer">
SUVs</a>

<a id="allcars" class="multilink" data-dls-links="#sportscars, #suv">
SUVs</a>

<a id="trucks" class="multilink" data-dls-links="fordpickup, toyotatundra">
trucks</a>

<a id="vehicles" class="multilink" data-dls-links="#allcars, #trucks">
trucks</a>

  • #vehicles
    • #allcars
      • #sportscars – bmwe36, ferrari360
      • #suv – toyotalandcruiser, fordexplorer
    • #trucks – fordpickup, toyotatundra

MultiLink keeps track of IDs, so there are no endless loops when names point at each other.

That’s the gist of ID Includes (recursion).  We basically fetch data from elsewhere, before moving on and parsing for tags.  (I didn’t show tags as part of the example, but they certainly work — I’m just keeping the example simple.)

Tag Expressions

As I have shown in previous posts, tags draw some inspiration from CSS Classes.  I use a leading ‘.’ to indicate a tag:

<a id="nyctag" class="multilink"
data-dls-links=".nyc">"nyc"</a>

… and I can have lists of tags:

<a id="nyclonsftag" class="multilink"
data-dls-links=".nyc, .london, .sf">
"links from nyc, london, or sf"</a>

As you can guess, straightforward comma-separated lists of tags can yield potentially big sets of everything that matches. Maybe that is good for what you want, and at other times, perhaps you want to narrow things down.

A Tag Expression parses through two or more tags that are part of one expression (no commas):

There are three operations that can be done: AND “+”, OR “|”, and WITHOUT “-”

AND

<a id="nycandbridge" class="multilink"
data-dls-links=".nyc + .bridge"
>"nyc AND bridge (+)

A “+” is used for “AND”. We DONT want all of the matches for the “.nyc” tag, added with all of the “.bridge” matches. That would give us nyc parks, london bridges, and a huge list. We want the things that “match .nyc AND that match .bridge”: i.e. the subset.

You can say things such as “.munich + .beerhall + .pilsner” to get very specific.

OR

Although one could think of “.nyc, .london, .sf” as a big “OR” of tags from different cities, there is another case. You may want to say “.nyc | .london + .bridge”. That means “grab the sets of tags that match either nyc or london, and show me just the ones that also have the tag of “bridge”.

You would use “|” (OR) to build up a big list, and then look for specific things within it. Another case is to toss specific things out. That is the next item: WITHOUT (“-“)

WITHOUT

<a id="nycorbridgenolon" class="multilink"
data-dls-links=".nyc | .bridge - .london"
>"nyc OR bridge, without London (| and -)</a>

Think of “-” for WITHOUT as meaning “subtract these items from what came before”. I might say “show me all of the cars from toyota, ford, and chevy, but dont show me the minivans”. That would be “.toyota | .ford | .chevy – .minivan”.

Tag Expressions are still somewhat simple minded. I dont have grouping with “(” and “)”, and I am not paying attention to operator precedence. I’m just winding through the expresson from left to right. That would seem to address most of the usual uses for this.

…. and, there is the notion of Regular Expression searches on labels, links, tags, and ids …

Wait, did I say that out loud? Not committing to anything, mind you. Just saying that I have a lot of thoughts as to where all of this can go.

Stopping Point For Now

This post, and the 2 parts before it (along with the 3 demos) lay out a pretty flexible and powerful approach towards dynamically building lists of links for a click. I’ve always thought that the idea of “one click can only go to one place, unless you are navigating a menu within the site” to be a bit limiting. MultiLink is an exercise in that leverages a bit of HTML5, jQuery, and JSON to show an idea I’ve been pondering for about 15 years 🙂

Enjoy!

The Part 1 Post, and demo
The Part 2 Post, and demo
The Part 3 demo

  1. that’s very barebones, and to go to the next step of explaining, I would say “you have a name of something, and when you click on that name, some javascript comes along that matches that name up against a list of web addresses that the page knows about”
Posted in programming, tech, Technical, web | Tagged , , , , | Comments Off on One Link, Many Paths, Clicking Choice! (MultiLink, Part 3)

One Link, Many Paths, Clicking Choice! (MultiLink, Part 2)

MultiLink, the real demo, is alive!

Go see the MultiLink Demo

This is my Part 2 post about MultiLink.  You can get some of the basic idea in Part 1.

To Recap…

The basic idea is to create a consistent, lightweight, and easy means to provide multiple urls to a standard web page link.

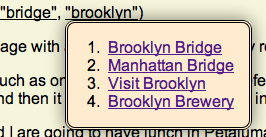
So clicking on a link named “Brooklyn” gives me this:

“Wait a minute!”, you say!  “That’s just a menu!”.   Well, yes and no.  It is a menu of places to go, in a more general and flexible scheme than merely navigating within a site 1

  • The list of targets are defined in a bit of JSON, outside of the web page
  • Each link uses a data attribute (I use “data-dls-links”, in order to claim a namespace) to define a list of targets
  • You can mix references to absolute ids of links, and tags which may match some links
  • This approach does not clutter the web page with a lot of hard definitions of places to go, and the contents of the JSON data can be updated with new ids, labels, urls, tags, etc.

MultiLink finds matches and creates lists of links.

What is New since the first demo?

There are two big changes I have made: JSON gets moved out to its own space 2, and I have implemented tags (think of how classes work for CSS).

I used to have this:

<!--      yikes, well this is one way of doing it.... -->
<a id="myLinks" class="multilink" href="#"
data-dls-links='{"allLinks" :[{"label": "one to Techcrunch..", "url": "http://techcrunch.com"},{"label": "and one to pinterest","url": "http://pinterest.com"}]}'>Set of links...</a>

While it works, it’s ugly and I think it could be error-prone. I also dont like the idea of hard-coding globs of JSON in the middle of a web page. It’s one more thing that could sway ones decision as to whether they could cache the HTML content or not.

Now I would rewrite the example above as:

<!--     much more concise, and not hardwired in html -->
<a id="myLinks" class="multilink" data-dls-links="techcrunch, pinterest">Set of links...</a>

Really? That’s it?! Yes, really. I think it makes a lot of sense to use the contents of the data attribute (in this case: “data-dls-links”) as a place to put the references to what I want in my link list.  I wrote all of the JavaScript glue to tie that together with the JSON data that defines links, labels, tags, and ids.

So, Where Is The Data?

It’s sitting in JSON, waiting for some JavaScript/jQuery to come parse it.

In my example, I have a file: js/Config.js.  It has blocks such as this:

"brooklynbrewery": {
        "label" : "Brooklyn Brewery",
        "url"   : "http://brooklynbrewery.com/",
        "tags"  : ["nyc", "brooklyn", "beer", "pub", "cafe"]
},

"sydneyoz": {
        "label" : "Sydney, Australia",
        "url"   : "http://en.wikipedia.org/wiki/Sydney",
        "tags"  : ["australia", "sydney", "city"]
},

It happens to be a file for the purposes of my example, but of course it could be a block of JSON data, fetched from an AJAX request. A sample of the complete JSON block would look like this:

"allLinks" : {
    "londontowerbridge": {
		"label"	: "London - Tower Bridge",
		"url"	: "http://en.wikipedia.org/wiki/Tower_Bridge",
		"tags"	: ["london", "city", "bridge"]
    }
}

In the example above:

  • “londontowerbridge” is a link ID
  • “London – Tower Bridge” is the label that will show for the link in the list
  • “http://en.wikipedia.org/wiki/Tower_Bridge” is where it will go
  • this link can be found by the tags of “london”, “city”, or “bridge”

A link has a data attribute. That atribute has a list of ids and tags. Some javascript reads that and matches it against a block of JSON, and creates a list of clickable targets. That’s MultiLink in a very small nutshell.

Tell Me About IDs and Tags …

In a data attribute, I can specify a list of references.  It’s the job of some JavaScript to turn those into links.

An ID is pretty easy:

data-dls-links="techcrunch, pinterest"

That just means “go find ‘techcrunch’ and ‘pinterest’ in my JSON block”. For every match, we add a new link.

What happens when there isn’t a match? Nothing. Think of it as a web page author putting placeholders in a page, and they become “live” later when there is some JSON definition for them.

What if one doesn’t know (or care) of a specific id, but just wants to match against tags? I’ve made it so that specifying that is just like referring to a CSS class: use a leading ‘.’ If I want to match any links with the tag of “city”, I would use:

data-dls-links=".city"

And of course, I can double up on these:

data-dls-links=".surfing, .snowboarding"

… And I can combine these:

data-dls-links="AngelinaJolie, BillClinton, .actor, .politician"

Which would give me a list that leads off with two specific links, followed by whatever I have that matches that tags of “actor” or “politician”.

What happens when a link gets matched multiple times (i.e by id and tag?) It is only used for the first match. It wont repeat, so the list will not get cluttered.

Groovy, What Next?

There are many possible next steps, but the three that I find most interesting would be:

  • Provide some options for the list, such as class, title, small icons, etc
  • Combine tags so that 2 or more of them would have to match. Example: “.germany+.beer” or “.nyc+.bridge”. There is also the notion of subtraction, such as “.music-.polka”
  • Show the related tags at the bottom of the list (or near each link), and make them clickable, so that a user can easily navigate to possible items of interest)

Thanks for checking this out. I will make a download of this available soon.

Go see the MultiLink Demo

This is my Part 2 post about MultiLink.  You can get some of the basic idea in Part 1. I continue this in Part 3.

  1. sure, it can do that, but the intent is more global…
  2. think of a javascript config file, or the results of an AJAX request
Posted in programming, tech, Technical, web | Tagged , , , , | Comments Off on One Link, Many Paths, Clicking Choice! (MultiLink, Part 2)

One Link, Many Paths, Clicking Choice! (MultiLink, Part 1)

Part 2, and Part 3 are now up!

A call to arms, of sorts…

Clickers Divide!  Be free of the tyranny of only having one choice of where to go!

For many years, I’ve wanted an easy means to provide more than one possible target for a link.  In some ways, you could think of this as a menu, or a tooltip, but more specific.

[for the impatient, a demo: MultiLink Demo]

I want to click on a link, and have an option to go to one of several places.  Content authors should have a means of providing, say, links that go to a summary vs in-depth, or to easy vs hard, or to one of many languages.

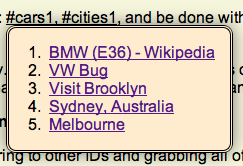
I want to click on this:

And see this:

Sure, there are hacks to do this, but I see something in HTML5 that opens the door wide…

HTML5 Data Attributes

With HTML5, you can add data to any HTML element by using an attribute that starts with “data-“.  So far so good.  I could say this in HTML:

</pre>
<ul>
  <li id="listItem20" data-nickname="bucky"
      data-state="california">Daniel</li>
</ul>
<pre>

And in jQuery I would use:

// grab some data we attached to a list element
var myNickname = $('#listItem20').data('nickname');
var myFaveState= $('#listItem20').data('state');

Ok, so knowing this, there are several ways I could go about attaching data to an anchor (“<a>”) tag. First off, I could toss a bunch of specific data names at it:


<a id="myLink" href="#"
   data-link-1="http://example.com/first"
   data-link-2="http://example.org/second"
   data-link-3="http://example.net/third">Some examples</a>

Eh.. shrug, yeah, it could work fine. I can certainly come along with some javascript and make a nice floating div with the 3 links. But wait! Where are our labels? Should we just use the addresses for our labels? Could we add data fields for that?

Sure, we could…


<a id="myLink" href="#"
   data-link-1="http://example.com/first"
   data-label-1="the first example"
   data-link-2="http://example.org/second"
   data-label-2="the second example"
   data-link-3="http://example.net/third"
   data-label-3="the third example">Some examples, with labels</a>

What’s the technical term? Oh, yes… Yuk! This looks like it could lead to some cluttered HTML, chock full of data atrributes, and resultant jQuery code that has to constantly do a lot of pattern matching to pick out urls and labels. It could work fine, but I didnt even bother to do my first example with this approach.

Because, after all, we have JSON…

I can assign a block of JSON to a data attribute. jQuery can then come along and parse through that. Groovy.

	<a id="myLinks" class="multilink" href="#"
	data-dls-links='{"allLinks" :[{"label": "one to Techcrunch..", "url": "http://techcrunch.com"},{"label": "and one to pinterest","url": "http://pinterest.com"}]}'>Set of links...</a>

On one hand, it is great that I can refer to one data attribute and find a variable number of labels and urls. On the other, there is a restriction that all of the data must be on the same line.

So much for nice formatting, but let’s work with this for this example, and then improve on it in a second take.

First off, let’s look at the JSON bit, formatted to better express what we’re trying to do:

<!-- just to show structure... -->
data-dls-links='{"allLinks" :[
   {
    "label": "one to Techcrunch..",
    "url": "http://techcrunch.com"
   },
   {
     "label": "and one to pinterest",
     "url": "http://pinterest.com"
   }
]}'>Set of links...

Ok, so “allLinks” is an array of groupings of labels and urls…

There is some usual jQuery code for binding click events, manipulating the css on a div, fading it in and out, etc., but the real key lines are this next batch, where we refer to the data attribute for the current element and build up our list of links:

var myData = $(this).data('dls-links');
var linkHTML = "<ol>";

$.each(myData.allLinks, function(current) {
    linkHTML += '<li><a target="mlwindow" href="' + this.url + '">' + this.label + '</a></li>';
});
linkHTML += "</ol>";

I wanted to be sure to point out that bit, because it will undergo some change in a second pass, in order to make this whole scheme a bit more flexible and not so unwieldy at the HTML element level 1

To be complete, I’ll post the code here, and point to the MultiLink Demo

<!DOCTYPE html>
<head>
	<title>Multilink Demo</title>

<style type="text/css">
body {
	font-family: Arial, "MS Trebuchet", sans-serif;

}
.hideme {
	display: none;
}

.multilink {
	text-decoration: underline;
}
</style>

	<script type='text/javascript' src='http://code.jquery.com/jquery-1.7.1.js'></script>
	<script type='text/javascript'>
$(document).ready(function() {
	$('.multilink').click(function() {

		if ($('#linkdiv').hasClass('hideme')) {
	 		var x = $(this).position().left;
	 		var y = $(this).position().top;

			var cssObj = {
				'z-index'	: 100,
				'display'	: "inline",
				'position'	: "absolute",
				'background' : "wheat",
				'left'		: x,
				'top'		: y,
				'margin-top': "1em",
				'padding'   : "0px 15px 0px 0px",
				'border'	: "double black",

				"-webkit-border-radius" : "10px",
				"-moz-border-radius"	: "10px",
				"border-radius"			: "10px",

			    "-moz-box-shadow" : "rgba(0,0,0,0.5) 10px 5px 24px 4px",
				"-webkit-box-shadow" : "rgba(0,0,0,0.5) 0px 0px 24px",

				'opacity'	: 0
			};

			var myData = $(this).data('dls-links');

			var linkHTML = "<ol>";

			$.each(myData.allLinks, function(current) {
				linkHTML += '<li><a target="mlwindow" href="' + this.url + '">' + this.label + '</a></li>';
			});
			linkHTML += "</ol>";

			$('#linkdiv').html(linkHTML);
			$('#linkdiv').removeClass('hideme');
			$('#linkdiv').css(cssObj);
			$('#linkdiv').stop().animate({opacity: 1.0},300);
		} else {
			$('#linkdiv').stop().animate({opacity: 0},500, function() {
				$('#linkdiv').empty();
				$('#linkdiv').removeAttr("style");
				$('#linkdiv').addClass('hideme');
			});
		}
	});

});
	</script>
</head>

<body>
	<div id="mainContent">
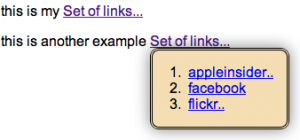
<p>this is my
	<a id="myLinks" class="multilink" href="#"
	data-dls-links='{"allLinks" :[{"label": "one to Techcrunch..", "url": "http://techcrunch.com"},{"label": "and one to pinterest","url": "http://pinterest.com"}]}'>Set of links...</a>
</p>

<p>this is another example
	<a id="myLinks2" class="multilink" href="#"
	data-dls-links='{"allLinks" :[{"label": "appleinsider..", "url": "http://appleinsider.com"},{"label": "facebook","url": "http://facebook.com"},{"label": "flickr..", "url": "http://flickr.com"}]}'>Set of links...</a>
</p>

	</div>

	<div id="linkdiv" class="hideme">I get replaced with the listing of links...</div>
</body>
</html>

As you will see, all of this so far is just setup for what I really want to show, which is:

  • how to use a data attribute as a reference to many IDs within a more centralized chunk of JSON
  • how to give links a tag (think of it much the same way as adding a class to an html element) — building up a list of links will allow you to mix and match absolute IDs and those that match whichever tags you want
  • how to handle optional attributes on a per-link basis

Go to Part 2
Go to Part 3

  1. I’m going to show how to point to data, as opposed to embedding it all
Posted in programming, tech, Technical | Tagged , | Comments Off on One Link, Many Paths, Clicking Choice! (MultiLink, Part 1)

Post Desktop? Sure. Post-PC? Not So Fast…

I’ve noticed a couple of articles by Sarah Perez over in TechCrunch about how we’re crossing into a Post-PC era:

The gist is that tablets and phones are eating the lunch of desktops, laptops, and netbooks.

And that is true.  They are.  The things that we use computers for are being spread over a wider variety of devices over the course of a day.

Sarah notes: Anyone who wastes their time debating its existence (tablets are PCs! phones are PCs!) is arguing semantics. The shift itself, whatever you want to call it, is happening.

Ah, but I think I’ll argue just a wee bit 🙂

Sure there is a shift.  We’ve had rotary 1 phones, push button phones, wireless phones in the home, and finally cell phones.  They’re all phones.  Nobody would say we’re in the post-phone era.  Sure we’ve cut the cord, the dial, and even the buttons and visible antennas, but we have more phones than ever.

A smartphone is a personal computer.  A tablet is a personal computer.   Smartphones are extremely personal, tucked away in our pockets and purses, and they’re more powerful than a room full of original Macintoshes.  Not only that, but they can handle bluetooth keyboards, display to monitors and TVs, and print…

I think that just as our notion of what makes a phone has radically evolved over the last 50 years, the same has happened with computers.  We dont have a mass produced computer any more personal than a smartphone! 🙂

I remember the days before an Apple 1 and the IBM PC, so, in some ways, one could say I am just being a cantankerous old git.  But my perspective gives me the sense that we’re just seeing a blurring, i.e. a wider variety of devices that tuck into the realm of personal computing 2

  1. wondering if I need to explain what a rotary phone is to the youngsters…
  2. they’re more personal than ever, and way more powerful than full blown desktop machines from not too long ago
Posted in Social, tech, Technical | Tagged , | Comments Off on Post Desktop? Sure. Post-PC? Not So Fast…

Let’s Start Volume 2

Hello There…

From 2003-2010, I wrote a blog: Cafe Bucky. It’s been quite a while since I’ve blogged, and I look back at the previous stuff and think “ok, that’s Volume 1, it’s time for a little reset”. 1

Wait, it’s 2012, a blog?

When I started blogging in 2003, it could be said I was a little ahead of the curve. Blogging supposedly peaked a couple of years ago.  I would maintain that people are still pretty active in posting their thoughts, but are increasingly splintered about it.  I look back fondly at Usenet 2, because it was the last time the internet community was pretty much in one place.

I’m splintered as well, being spread out over Facebook, Google+, and Twitter.. oh, and Pinterest, and…. heck, where did all of these accounts come from?

So my idea of a blog is to have a spot to corral everything else, and to be comfy when I have more than 140 characters to say (and not so off the cuff as Facebook or G+).

OMG, sounds like I want a blog when I’m being thoughtful!  Ha! —   Nah, that’s too hoity toity.  That ain’t me, babe.   I just need a place where I can crack my writing knuckles 3

And just to make sure I dont get all self-important, it’s “BuckyBits”.  Yeah, I could have had “From the Desk of HRH Daniel Smith” and so on, but really now… good to stay grounded.

Do I care about any stigma for having a longform place to write, and not being content to fit into little thought-buckets for consumption by the hyper flitting net.masses getting a little fluffy social fix as they wait in line at Starbucks? Um, no, I dont give the f*** of a thousand flying squirrels!  (yeah, I’m not sure what that looks like either.)

A Basic Contradiction About Me Is…

So, on one hand, I am not like the younger generations that seem to only post in little blips, nor am I akin to a scholarly & wizened academic, who would write the simplest points in endless serpentine sentences… I can be fond of going deeper (i..e. more than a paragraph).

…but I also embrace many of the short forms (Tumblr, FB, Twitter, etc.), and have a very good grasp on Social Media & Networking 4.

The contradiction really isn’t one.  I’m just into “context”.  Sometimes it’s little thoughts in Twitter, and other times I want to write a novel.  Sometimes I want to switch off the fast pace of modern life and go take care of a lighthouse in Ireland, and other times I want to move back to NYC and live and breathe in the startup world.

Smashes a champagne bottle over the SS Volume 2!

daniel-mug-stubble-june2011

  1. … or it could be that I am embarrassed about not posting for a year 😉
  2. hmm, how do I explain Usenet to the kids… a worldwide internet and uucp-based bbs dating back to 80’s, split up into 1000’s of very topic-specific newsgroups.  A huge percentage of Usenetters could actually write more than a paragraph at a time
  3. you know, it’s Sophia that’s “good” at cracking her knuckles.  Odd kid!
  4. …which just comes from following Tech and the Internet for 30+ years, and always finding something new to love about it…
Posted in blog, Creative, Technical | Tagged , | Comments Off on Let’s Start Volume 2